Redux
- react에서 가장 사용률이 높은 상태 관리 라이브러리이다.
context API+useReducer 사용과 Redux의 차이점
1. Redux에는 미들웨어라는 개념이 있다. 미들웨어를 사용하면 비동기 작업을 더욱 체계적으로 관리 가능하다.
2. 리덕스 사용하면 유용한 함수와 hook 을 사용할 수 있다. (connect, useSelector, useDispatch, useStore)
3. 기본적인 최적화가 이미되어있다.
4. 하나의 커다란 상태
5. DevTools
6. 이미 사용중인 프로젝트가 많다
언제 써야할까?
프로젝트 규모가 큰경우 - Y : Redux / N : Context API
비동기 작업을 자주 하는 겨우 - Y : Redux / N : Context API
리덕스가 편한 경우 - Y : Redux / N : Context API or MobX
리덕스에서 사용되는 키워드 숙지하기
액션 action
- 상태 업데이트 시 어떻게 업데이트해야하는지 정보를 지니고 있는 객체
- type 값은 필수
액션 생성함수 action creator
- 액션객체를 만들어주는 함수, parameter를 받아와서 액션을 만들어주는 함수
리듀서 reducer
- 상태를 바꿔주는 함수, 변화를 일으키는 함수 (불변성유지(concat, filter))
- 현재상태 state와 action객체를 파라미터로 받아와서 새로운 상태를 만들어줌
- 리듀서에서 default에서는 error 반환보다 기존의 state를 반환하게 작성
스토어 store
- 하나의 애플리케이션에서는 하나의 스토어만 만들어진다
- 스토어안에 현재앱의 상태와 리듀서,
- 추가적으로 내장함수(dispatch(액션 전달, 발생))
+ 내장함수 - 구독 sunscribe(파라미터로 특정함수를 넣어주면 액션이 dispatch 될때마다 설정한 함수 호출)
리덕스에서 지켜야 할 3가지 규칙
1. 하나의 애플리케이션에서는 하나의 스토어만 있다.
2. 상태는 읽기전용이다. = 불변성을 지켜야한다.
3. 변화를 일으키는 함수 리듀서는 순수한 함수여야 한다.
(순수한 함수 ? - 리듀서 함수는 이전 상태와, 액션 객체를 파라미터로 받는다. 이전이 상태는 절대 변경하지 않고, 변화를 일으킨 새로운 상태 객체를 만들어 반환한다. 똑같은 파라미터로 호출된 리듀서 함수는 언제나 똑같은 결과값을 반환해야한다.)
(=> new Date(), Math.random(), axios.get() 불가 - 값이 변경되기 때문에)
(↑사용해야한다면 해당 컴포넌트에서 사용하거나 미들웨어를 사용함)
1. react component 없이 redux 사용해보기
import { createStore } from "redux";

//react component 없이 reudux만 사용해보기 - 실습
//redux에서 관리할 상태 정의
//상태 초깃값
const initialState = {
  counter: 0,
  text: "",
  list: [],
};

//action type 정의
const INCREASE = "INCREASE";
const DECREASE = "DECREASE";
const CHANGE_TEXT = "CHANGE_TEXT";
const ADD_TO_LIST = "ADD_TO_LIST";

//action 생성함수
const increase = () => ({
  type: INCREASE,
});

const decrease = () => ({
  type: DECREASE,
});

const changeText = (text) => ({
  type: CHANGE_TEXT,
  text,
});

const addToList = (item) => ({
  type: ADD_TO_LIST,
  item,
});

//reducer
function reducer(state = initialState, action) {
  switch (action.type) {
    case INCREASE:
      return {
        ...state,
        counter: state.counter + 1,
      };
    case DECREASE:
      return {
        ...state,
        counter: state.counter - 1,
      };
    case CHANGE_TEXT:
      return {
        ...state,
        text: action.text,
      };
    case ADD_TO_LIST:
      return {
        ...state,
        item: state.list.concat(action.item),
      };
    default:
      return state;
  }
}

//store 만들기
const store = createStore(reducer);
console.log(store.getState()); //현재 store 안에 있는 상태 조회하는 법

//store 구독해보기
const listener = () => {
  const state = store.getState();
  console.log(state);
};

const unsubscribe = store.subscribe(listener);
// + 구독해지하고싶을때, unsubscribe(); ---> 호출하면 됨

//action dispatch하기
store.dispatch(increase());
store.dispatch(decrease());
store.dispatch(changeText("안녕하세요"));
store.dispatch(addToList({ id: 1, text: "와우" }));

//구독 후, action이 dispathch 될때마다 subscribe함수(현재 상태)가 호출됨
 ↓
// {counter: 1, text: "", list: Array(0)}
// counter: 1
// list: []
// text: ""
// __proto__: Object

// {counter: 0, text: "", list: Array(0)}
// counter: 0
// list: []
// text: ""
// __proto__: Object

// {counter: 0, text: "안녕하세요", list: Array(0)}
// counter: 0
// list: []
// text: "안녕하세요"
// __proto__: Object

// {counter: 0, text: "안녕하세요", list: Array(0), item: Array(1)}
// counter: 0
// item: [{…}]
// list: []
// text: "안녕하세요"
// __proto__: Object
2. react 프로젝트에서 redux 사용하기
- action type, action 생성함수, reducer => 하나의 파일에 몰아서 작성하는 Ducks 패턴 사용해보기
- Ducks패턴사용시, 앞에 접두사를 넣어야함 - 다른 모듈과 이름이 겹치지 않게하기 위해서
1. counter, todos 각각 redux 모듈 만들어주기
//counter.js

//action type 정의
//Ducks패턴사용시 앞에 접두사를 넣기
const SET_DIFF = "counter/SET_DIFF";
const INCREASE = "counter/INCREASE";
const DECREASE = "counter/DECREASE";

//action 생성함수 - export
export const setDiff = (diff) => ({
  type: SET_DIFF,
  diff,
});

export const increase = () => ({
  type: INCREASE,
});

export const decrease = () => ({
  type: DECREASE,
});

//reducer에서 관리할 초기상태
const initialState = {
  number: 0,
  diff: 1,
};

//reducer - export default
export default function counter(state = initialState, action) {
  switch (action.type) {
    case SET_DIFF:
      return {
        ...state,
        diff: action.diff,
      };
    case INCREASE:
      return {
        ...state,
        number: state.number + state.diff,
      };
    case DECREASE:
      return {
        ...state,
        number: state.number - state.diff,
      };
    default:
      return state;
  }
}
//todos.js
const ADD_TODO = "todos/ADD_TODO";
const TOGGLE_TODO = "todos/TOGGLE_TODO";

let nextId = 1;
export const addTodo = (text) => ({
  type: ADD_TODO,
  todo: {
    id: nextId++,
    text,
  },
});

export const toggleTodo = (id) => ({
  type: TOGGLE_TODO,
  id,
});

const initialState = [
  //   {
  //     id: 1,
  //     text: "예시",
  //     done: false,
  //   },
];

export default function todos(state = initialState, action) {
  switch (action.type) {
    case ADD_TODO:
      return state.concat(action.todo);
    case TOGGLE_TODO:
      return state.map((todo) =>
        todo.id === action.id ? { ...todo, done: !todo.done } : todo
      );
    default:
      return state;
  }
}
2. reducer 두개를 합쳐주는 rootReducer 만들기
//modules/index.js
//reducer 두개 합쳐주기 - rootReducer 만들기

import { combineReducers } from "redux";
import counter from "./counter"; //counter reducer 가져오기
import todos from "./todos"; //todos reducer 가져오기

//rootReducer 만들기
const rootReducer = combineReducers({
  counter,
  todos,
});

export default rootReducer;
3. react에 redux 적용하기
npm install react-redux 설치
//index.js
import React from "react";
import ReactDOM from "react-dom";
import "./index.css";
import App from "./App";
import reportWebVitals from "./reportWebVitals";
import { Provider } from "react-redux";
import { createStore } from "redux";
import rootReducer from "./modules"; //index 생략가능

const store = createStore(rootReducer);
//console.log(store.getState()); 현재상태, 객체 확인

ReactDOM.render(
  <Provider store={store}>
    <App />
  </Provider>,
  document.getElementById("root")
);
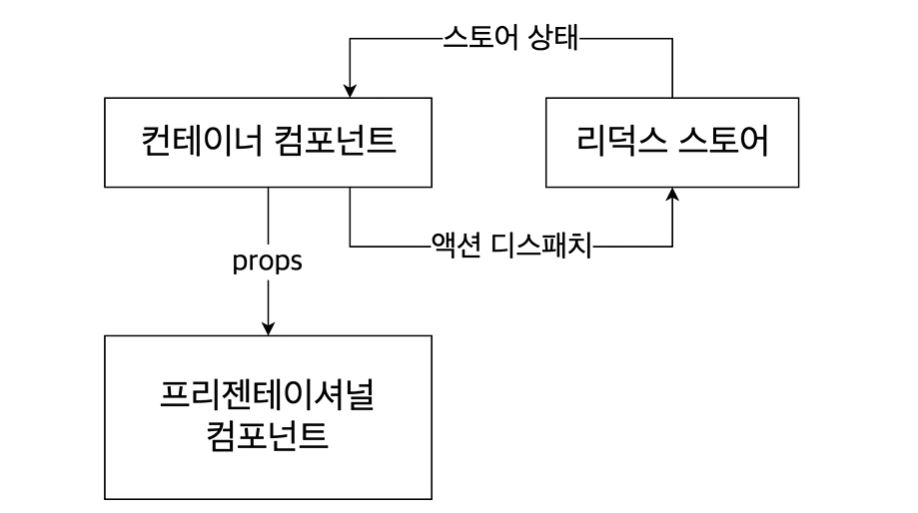
4. 컨테이너 컴포넌트 만들기
- 컨테이너 컴포넌트
- 컨테이너 컴포넌트란, 리덕스 스토어의 상태를 조회하거나, 액션을 디스패치 할 수 있는 컴포넌트를 의미
- HTML 태그들을 사용하지 않고 다른 프리젠테이셔널 컴포넌트들을 불러와서 사용
- 상태조회시에는 react-redux에 있는 useSelector 사용
=> 상태관리
//container/CounterContainer.js
import React from "react";
import Counter from "../components/Counter";
import { useSelector, useDispatch } from "react-redux";
import { decrease, increase, setDiff } from "../modules/counter";

//useSelector의 state는 StorageEvent.getState()의 객체(현재상태)와 같다.
function CounterContainer() {
  const { number, diff } = useSelector((state) => ({
    number: state.counter.number,
    diff: state.counter.diff,
  }));

  const dispatch = useDispatch();

  const onIncrease = () => dispatch(increase());
  const onDecrease = () => dispatch(decrease());
  const onSetDiff = (diff) => dispatch(setDiff(diff));

  return (
    <Counter
      number={number}
      diff={diff}
      onIncrease={onIncrease}
      onSetDiff={onSetDiff}
      onDecrease={onDecrease}
    />
  );
}

export default CounterContainer;
5. 프리젠테이셔널 컴포넌트 만들기
- 프리젠테이셔널 컴포넌트
- 프리젠테이셔널 컴포넌트란, 리덕스 스토어에 직접적으로 접근하지 않고 필요한 값 또는 함수를 props 로만 받아와서 사용하는 컴포넌트
- 프리젠테이셔널 컴포넌트에선 주로 이렇게 UI를 선언하는 것에 집중하며, 필요한 값들이나 함수는 props 로 받아와서 사용하는 형태로 구현
=> 단순히 UI에 집중
//components/Counter.js
import React from "react";

function Counter({ number, diff, onSetDiff, onIncrease, onDecrease }) {
  const onChange = (e) => {
    onSetDiff(parseInt(e.target.value, 10));
  };

  return (
    <div>
      <h1>{number}</h1>
      <div>
        <input type="number" onChange={onChange} value={diff} />
        <button onClick={onIncrease}>+</button>
        <button onClick={onDecrease}>-</button>
      </div>
    </div>
  );
}

export default Counter;
** 구조 파악하기 **
'Redux' 카테고리의 다른 글
| Redux Toolkit (0) | 2021.05.05 |
|---|---|
| [Redux 강의노트] Redux Middleware | redux-saga (0) | 2021.01.13 |
| [Redux 강의노트] Redux Middleware | logger, thunk (0) | 2021.01.09 |
| React → Redux | Redux 101 (2/2) (0) | 2020.11.24 |
| VanillaJS → Redux | Redux 101 (1/2) (0) | 2020.11.18 |

